Blog
Why Is Your Industrial Embroidery Machine Not Meeting Production Targets?
By Ramana Machines · November 11, 2026
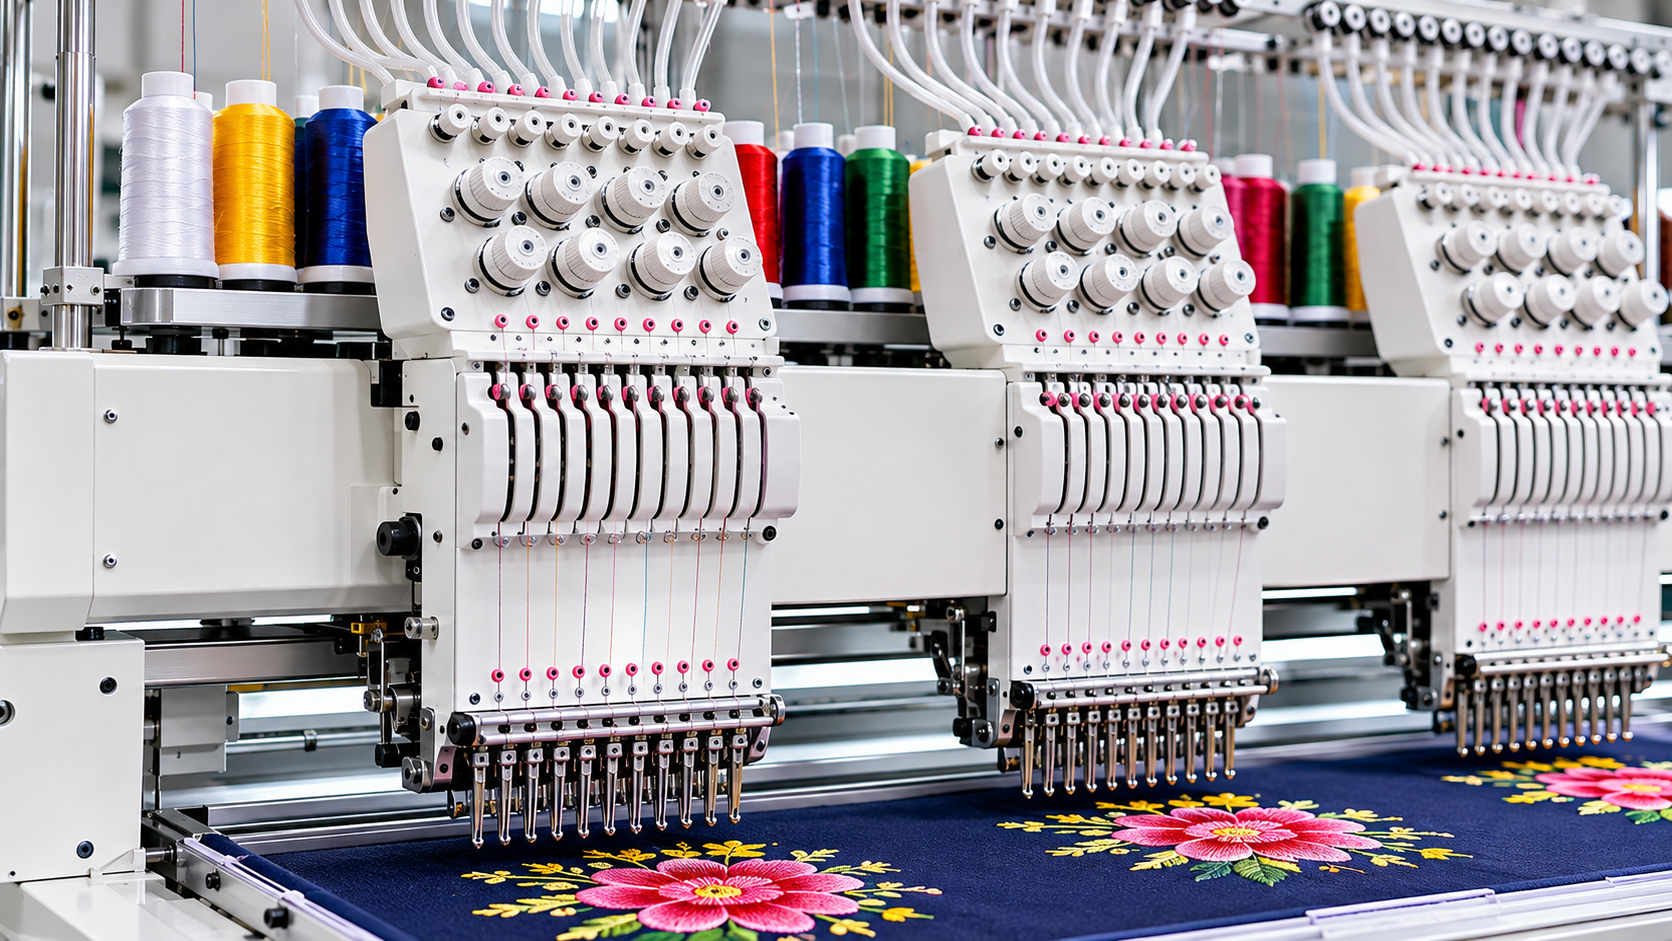
Is your industrial embroidery machine falling behind production targets? Frequent thread breaks, incorrect tension, needle and hook timing issues, design errors, and poor maintenance can reduce daily output. Learn how important machine parts work, how to identify common problems, and what practical steps can help improve production efficiency.
Industrial embroidery machines are designed to handle large production volumes while maintaining consistent stitch quality. However, even a well-equipped machine may fail to meet its expected production targets. Frequent thread breaks, machine stoppages, design errors, incorrect settings, poor maintenance, and operator mistakes can all reduce daily output.
When production falls behind schedule, the first step should be to identify where the problem is occurring. Sometimes the issue is related to a single component, while in other cases multiple machine parts or operating conditions affect overall performance.
Understanding how each part works can help operators identify faults, reduce unnecessary stoppages, and improve production efficiency. This guide explains the important parts of an industrial embroidery machine, common reasons for low production, and practical solutions to improve machine performance.
1. Incorrect Thread Tension and Frequent Thread Breakage
Thread breakage is one of the most common reasons for reduced embroidery production. Every time a thread breaks, the operator may need to stop the machine, rethread it, check the stitching, and restart the design.
If this happens repeatedly, even small interruptions can result in significant production delays.
Important machine parts involved:
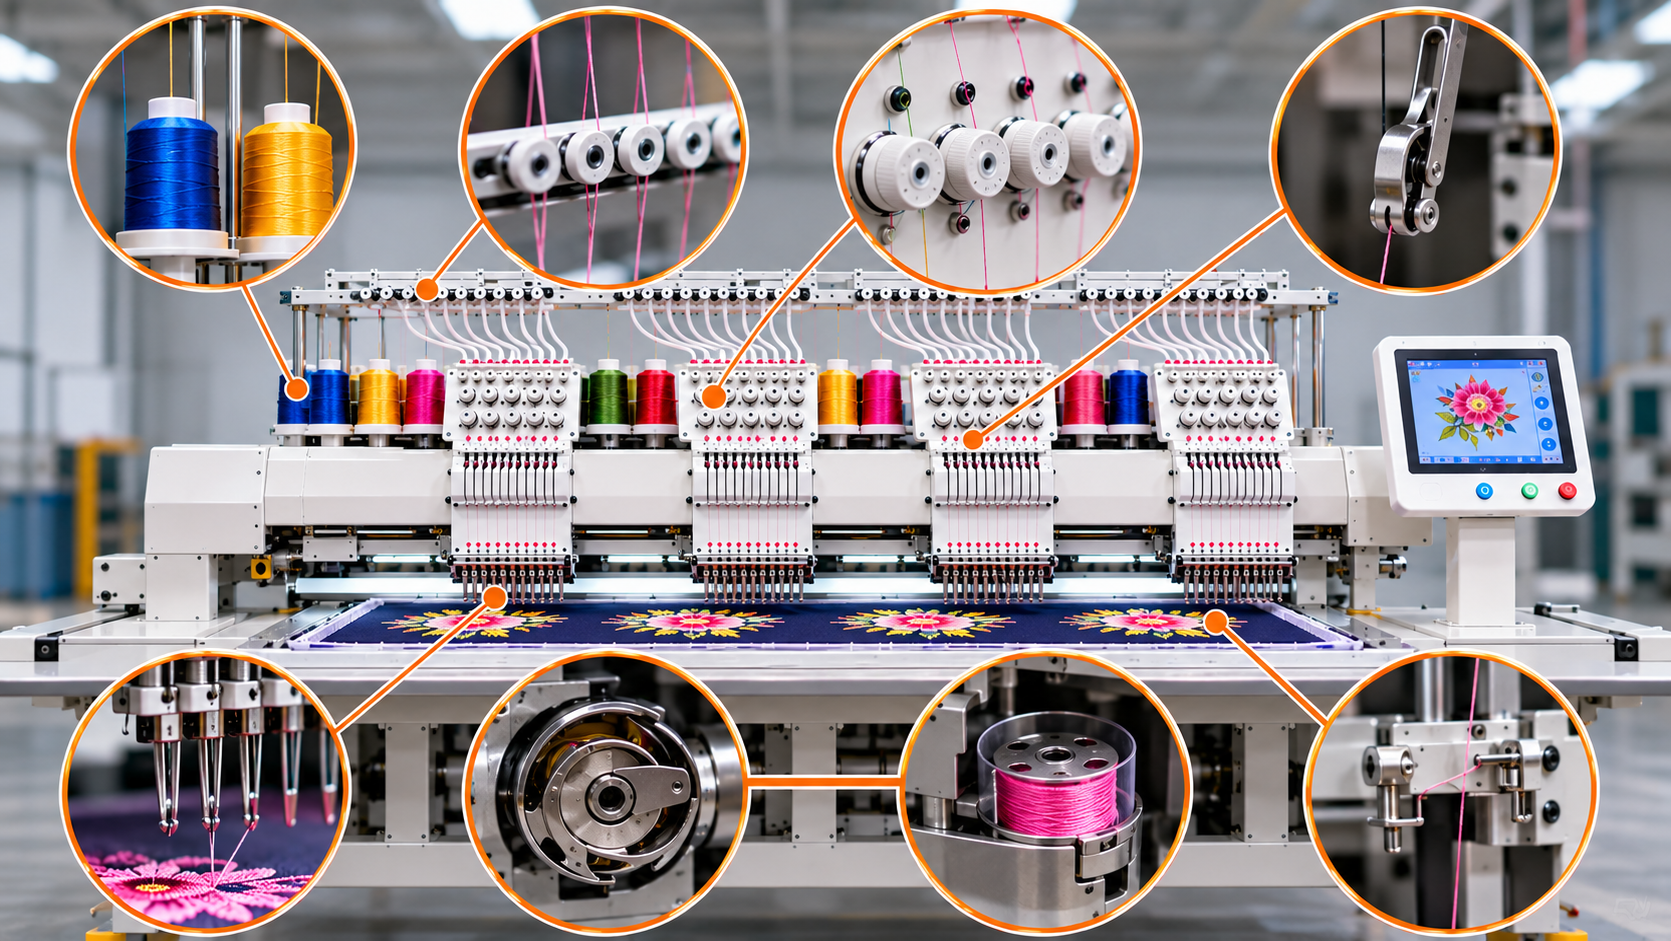
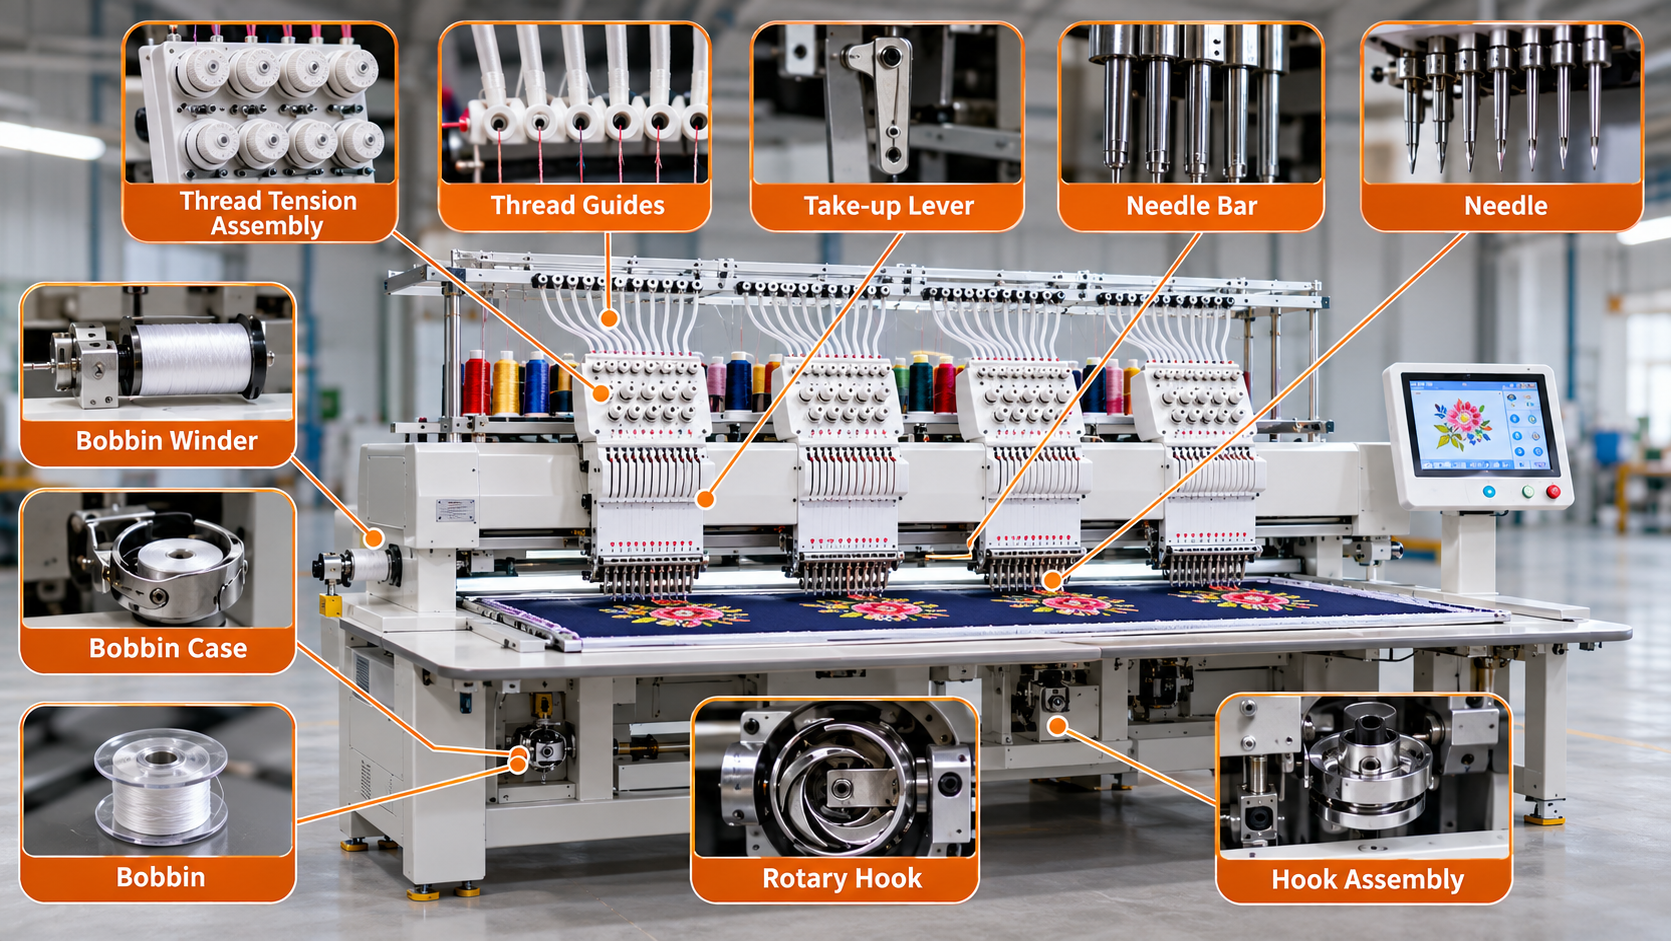
- Thread tension assembly: Controls the amount of resistance applied to the upper thread as it moves towards the needle. Incorrect tension can cause loose stitches, tight stitches, or thread breakage.
- Thread guides: Direct the thread through the correct path before it reaches the needle. Improper threading, damaged guides, or accumulated lint can affect smooth thread movement.
- Take-up lever: Moves up and down to control the upper thread supply and pull the thread into the stitch. Incorrect movement or thread positioning can lead to inconsistent stitches.
- Needle: Carries the upper thread through the fabric. A bent, damaged, blunt, or incorrectly installed needle can cause frequent thread breaks.
Possible causes:
- Incorrect upper-thread tension.
- Poor-quality or unsuitable embroidery thread.
- Incorrect needle size or type.
- Damaged thread guides.
- Incorrect threading.
- Excessive machine speed for the selected thread and fabric.
Solutions:
- Check the threading path according to the machine manual.
- Adjust upper-thread tension gradually rather than making large changes.
- Use suitable thread and needle combinations for the fabric.
- Replace bent, blunt, or damaged needles.
- Clean thread guides and remove accumulated lint.
- Reduce machine speed if thread breaks continue during high-speed operation.
2. Needle and Hook Timing Problems
The needle and hook work together to form embroidery stitches. If their timing is incorrect, the machine may skip stitches, break threads, or produce inconsistent embroidery.
Important machine parts involved:
- Needle bar: Holds the needle and controls its vertical movement during stitching.
- Needle: Passes through the fabric and carries the upper thread to form the stitch.
- Rotary hook or shuttle hook: Captures the upper-thread loop formed by the needle and helps interlock it with the bobbin thread.
- Hook assembly: Contains the hook and related components responsible for catching the thread loop during stitch formation.
Possible causes:
- Incorrect needle and hook timing.
- Bent or incorrectly installed needles.
- Damaged hook points.
- Excessive clearance between the needle and hook.
- Loose mechanical components.
- Lint or thread pieces around the hook assembly.
Solutions:
- Inspect the needle for bending or damage.
- Check whether the needle is installed in the correct direction and position.
- Clean the hook area and remove loose thread pieces.
- Inspect the hook point for scratches or damage.
- Ask a qualified technician to check needle-to-hook timing and clearance if skipped stitches continue.
Avoid changing hook timing without the correct technical instructions. Incorrect adjustments can create additional stitching problems or damage machine components.
3. Bobbin and Lower Thread Problems
The bobbin supplies the lower thread required to form embroidery stitches. If the bobbin thread is not feeding correctly, the machine may produce loose stitches, thread loops, uneven stitching, or frequent stoppages.
Important machine parts involved:
- Bobbin: A small spool that holds the lower thread.
- Bobbin case: Holds the bobbin and controls the lower-thread tension as the thread is released.
- Bobbin winder: Winds thread evenly onto the bobbin before it is used for stitching.
- Rotary hook: Interlocks the upper thread with the lower bobbin thread to form a stitch.
Possible causes:
- Incorrect bobbin winding.
- Uneven or loose bobbin thread.
- Incorrect lower-thread tension.
- Damaged bobbin case.
- Dust or lint inside the hook and bobbin area.
- Incorrect bobbin installation.
Solutions:
- Check whether the bobbin is wound evenly.
- Install the bobbin in the correct direction.
- Inspect the bobbin case for damage or rough edges.
- Clean the bobbin and hook area regularly.
- Use suitable bobbin thread and follow the recommended tension settings.
Replace damaged bobbin cases when required.
4. Incorrect Embroidery Speed and Machine Settings
Running a machine at high speed does not always result in higher production. If the selected speed is unsuitable for the design, fabric, thread, or machine condition, it can increase thread breaks, skipped stitches, vibration, and machine stoppages.
Important machine parts involved:
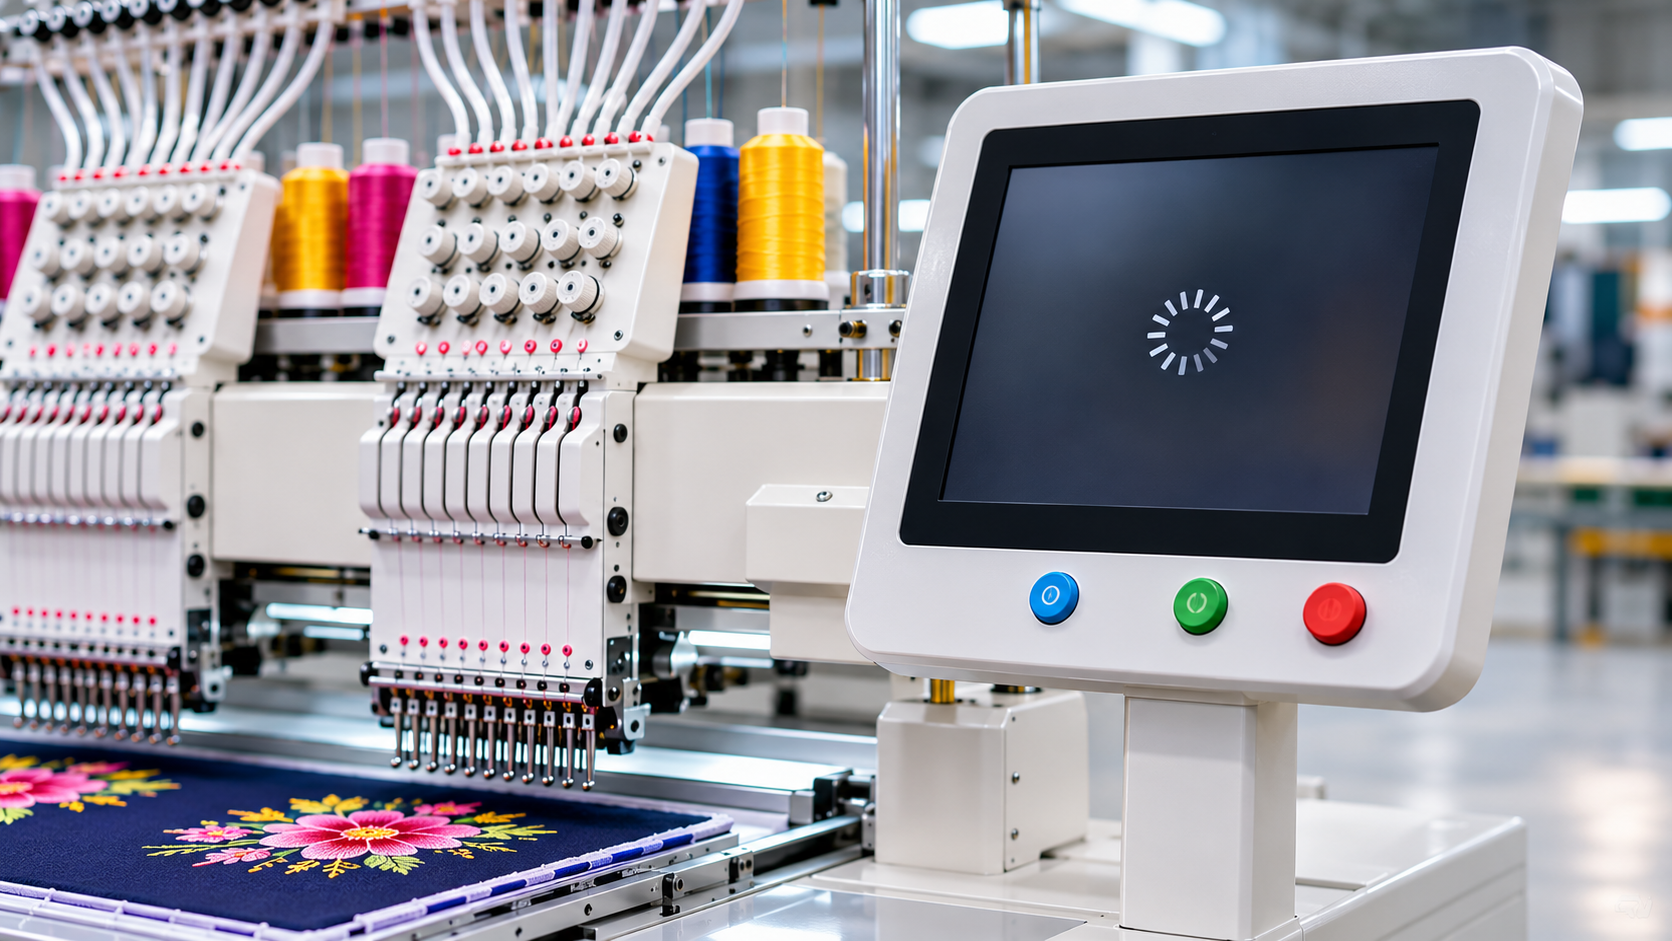
- Control panel: Allows operators to select designs, adjust machine settings, monitor operations, and control production functions.
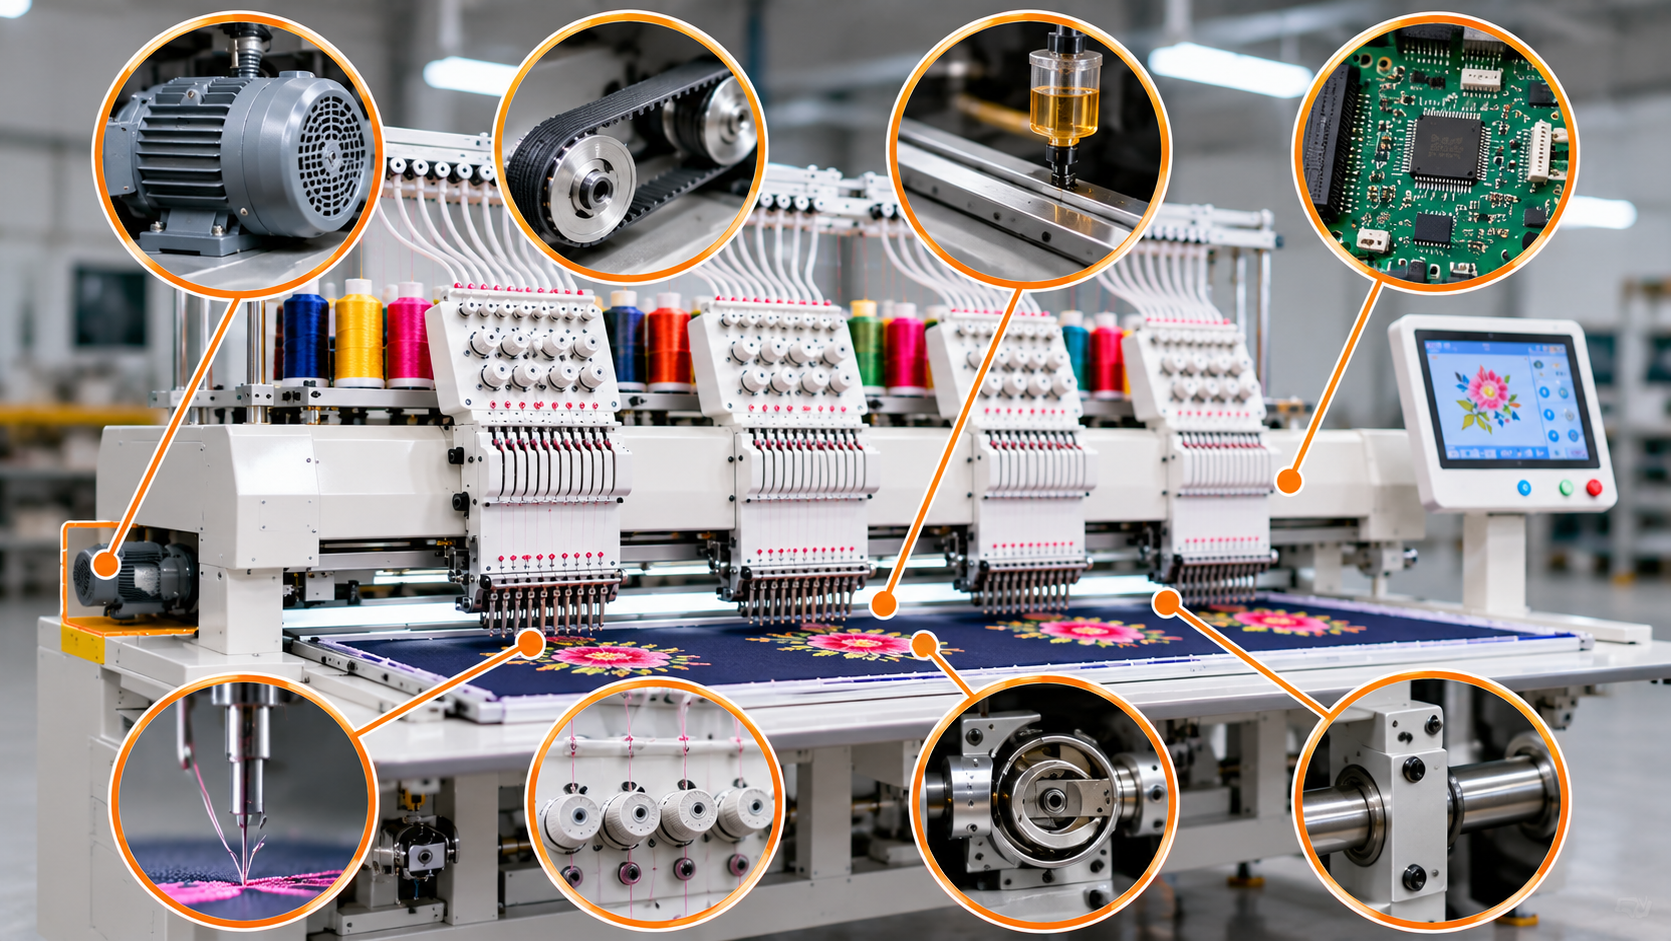
- Main drive motor: Provides the power required to operate the machine's stitching mechanism.
- Main shaft: Transfers rotational movement to the mechanical components responsible for stitch formation.
- Speed control system: Regulates machine operating speed according to the selected settings and machine design.
Possible causes:
- Machine speed set too high.
- Incorrect settings for fabric thickness.
- Complex designs running at unsuitable speeds.
- Poor acceleration and deceleration settings.
- Incorrect stitch parameters.
- Operators using the same speed for every design.
Solutions:
- Select a suitable speed based on fabric, thread, and design complexity.
- Reduce speed when stitching dense or detailed designs.
- Check machine settings before starting a new production batch.
- Monitor vibration and unusual noise during operation.
- Follow the manufacturer's recommended operating speed.
- Test a sample design before starting bulk production.
5. Fabric Movement and Hoop Positioning Problems
Correct fabric positioning is essential for accurate embroidery. If the fabric moves during stitching, the design may become distorted, misaligned, or uneven. This can result in rejected pieces and additional production time.
Important machine parts involved:
- Embroidery frame or hoop: Holds the fabric securely in the required position during stitching.
- Pantograph or X-Y movement system: Moves the embroidery frame horizontally and vertically according to the design pattern.
- Frame drive mechanism: Transfers movement to the frame so the machine can stitch at different positions.
- Clamps and fabric holders: Help keep the fabric stable during embroidery, depending on the machine configuration.
Possible causes:
- Fabric not secured properly.
- Incorrect hoop size.
- Loose frame connections.
- Incorrect fabric tension.
- Damaged frame movement components.
- Fabric thickness or stretch not considered during setup.
Solutions:
- Secure the fabric evenly in the embroidery frame.
- Use a suitable hoop or frame for the product.
- Check frame connections before production.
- Use appropriate stabilizers for the fabric.
- Avoid excessive fabric stretching while hooping.
- Inspect the X-Y movement system if the frame moves unevenly or produces positioning errors.
6. Thread Trimming Problems and Unnecessary Machine Stops
Automatic thread trimming helps reduce manual work between colour changes and design sections. If the trimming system does not operate correctly, operators may need to stop the machine and remove loose threads manually.
Important machine parts involved:
- Thread trimmer: Cuts the upper or lower thread automatically at programmed points.
- Trimming knife: Performs the cutting action within the trimming mechanism.
- Trimmer drive mechanism: Moves the trimming components during the cutting cycle.
- Thread catcher or related mechanism: Helps position or control the thread during trimming, depending on the machine design.
Possible causes:
- Blunt or damaged trimming knife.
- Thread not positioned correctly for cutting.
- Lint or thread pieces blocking the mechanism.
- Incorrect trimming settings.
- Mechanical wear or incorrect trimmer timing.
Solutions:
- Clean the thread trimming area regularly.
- Inspect the knife for damage or wear.
- Check the trimming settings in the control panel.
- Remove loose thread pieces from the mechanism.
- Ask a technician to inspect trimmer timing if the problem continues.
7. Design Errors and Excessive Stitch Count
Sometimes the machine is working correctly, but the embroidery design itself is reducing production speed. Designs with excessive stitch density, unnecessary jump stitches, complicated colour changes, and poor digitizing can increase stitching time.
Important machine parts and systems involved:
- Control system: Reads and processes the embroidery design instructions.
- Control panel: Allows the operator to select and manage the design file.
- Needle selection mechanism: Selects the required needle or colour according to the programmed sequence on machines with automatic colour changing.
- Thread trimming system: Handles thread cuts between design sections where programmed.
Possible causes:
- Excessive stitch count.
- Too many unnecessary colour changes.
- Incorrect stitch density.
- Poor underlay settings.
- Unnecessary jump stitches.
- Design size not suitable for the selected frame.
Solutions:
- Review the design before production.
- Ask an experienced digitizer to optimize stitch density and underlay.
- Reduce unnecessary jumps and colour changes where possible.
- Check the design size against the embroidery frame.
- Run a sample to identify stitching and alignment issues before bulk production.
8. Sensor and Electrical System Faults
Modern industrial embroidery machines use electronic systems and sensors to monitor different machine functions. Electrical problems or sensor faults can interrupt production even when the mechanical components are working properly.
Important machine parts involved:
- Sensors: Detect specific machine conditions, such as thread breaks, machine positions, or other operating functions depending on the model.
- Control board: Processes signals from the control system and coordinates machine operations.
- Power supply unit: Provides the electrical power required by the machine's electronic components.
- Display and control panel: Shows machine status, settings, and error messages to the operator.
- Motor driver: Controls the operation of motors according to the machine's electronic commands.
Possible causes:
- Loose electrical connections.
- Faulty sensors.
- Unstable power supply.
- Damaged cables.
- Control board errors.
- Incorrect machine parameters.
Solutions:
- Record the error message displayed on the machine.
- Check the power supply and visible cable connections.
- Keep electrical panels clean and protected from dust.
- Inspect sensors according to the manufacturer's maintenance instructions.
- Avoid repeatedly restarting the machine without identifying the fault.
- Contact a qualified technician for electrical or control-board problems.
Electrical panels should only be opened and serviced by trained personnel after following the required power-isolation and safety procedures.
9. Poor Maintenance and Lack of Regular Inspection
Even a properly installed industrial embroidery machine can lose efficiency if it does not receive regular maintenance. Dust, lint, dried lubricant, loose components, and worn parts can gradually affect machine performance.
Important machine parts involved:
- Lubrication points: Areas where oil or approved lubricant is applied to reduce friction between moving components.
- Bearings: Support rotating or moving parts and help them operate smoothly.
- Belts: Transfer movement between drive components.
- Cooling fans: Help maintain suitable operating temperatures in electrical or motor assemblies where fitted.
- Needle plate: Supports the fabric around the needle area during stitching.
Possible causes:
- Irregular cleaning.
- Insufficient or incorrect lubrication.
- Worn needles and mechanical components.
- Loose screws and connections.
- Dust accumulation around moving parts.
- Maintenance schedules not being followed.
Solutions:
- Follow the machine manufacturer's daily and periodic maintenance schedule.
- Clean lint and thread waste from the needle, bobbin, and hook areas.
- Lubricate only the recommended points using the specified lubricant.
- Inspect belts, bearings, and moving components for wear.
- Replace damaged consumables and worn parts when required.
- Maintain a maintenance record for every machine.
10. Problems Specific to Multi-Head Embroidery Machines
Multi-head embroidery machines can produce several pieces simultaneously, making them suitable for larger production requirements. However, if one head develops a problem, it can affect production planning and create quality differences between heads.
Important machine parts involved:
- Embroidery heads: Individual stitching units that perform embroidery on separate products or fabric positions.
- Needle bars: Hold and move the needles in each head.
- Rotary hook assemblies: Form stitches with the upper and lower threads at each stitching position.
- Head drive and transmission components: Help operate the stitching mechanism across the machine.
- Thread break sensors: Detect thread interruptions where fitted.
- Control system: Coordinates design execution and machine functions across the heads.
Possible causes:
- Different thread tension across heads.
- Worn needles in one or more heads.
- Uneven hook timing.
- Incorrect threading in individual heads.
- Different fabric positioning.
- One head experiencing repeated thread-break errors.
Solutions:
- Compare stitch quality across all heads.
- Check thread tension and needle condition head by head.
- Ensure every head is threaded correctly.
- Clean the hook and bobbin areas regularly.
- Identify whether a fault occurs on one head or across the entire machine.
- Arrange technical inspection if one head repeatedly produces defects.
Checking each head separately can help operators identify the source of a problem instead of adjusting the entire machine unnecessarily.
11. How to Identify the Actual Reason for Low Production
Before making adjustments, record the production problem and identify how frequently it occurs. This makes troubleshooting more systematic and helps avoid unnecessary changes to machine settings.
Production problem | Parts or areas to inspect | Recommended action |
| Frequent thread breaks | Needle, tension assembly, thread guides | Check threading, tension, and needle condition |
| Skipped stitches | Needle, hook, needle bar | Inspect needle condition and hook timing |
| Loose or uneven stitches | Tension assembly, bobbin case | Check upper and lower thread tension |
| Fabric misalignment | Hoop, frame, X-Y movement system | Secure fabric and inspect frame movement |
| Poor thread trimming | Trimmer knife, thread catcher, drive mechanism | Clean and inspect the trimming system |
| Repeated machine errors | Sensors, cables, control board | Record error codes and arrange diagnosis |
| Slow production | Speed settings, design file, thread breaks | Review design efficiency and machine settings |
| Different quality across heads | Individual needles, hooks, tension settings | Inspect and compare each head separately |
12. Practical Daily Checks to Improve Production Efficiency
A simple daily inspection routine can help identify small problems before they cause major production delays.
Before starting production:
- Check thread quality and availability.
- Inspect needles for bending or damage.
- Confirm correct threading and tension.
- Check bobbin installation and thread supply.
- Clean the hook and bobbin areas.
- Verify design files and machine settings.
- Ensure the fabric is positioned correctly.
During production:
- Monitor thread breaks and machine stoppages.
- Observe unusual sounds or vibration.
- Check whether all heads are producing consistent embroidery.
- Record recurring errors.
- Avoid running the machine at unsuitable speeds.
After production:
- Remove lint and loose threads.
- Clean the needle and hook areas.
- Inspect the machine for visible wear or damage.
- Follow the recommended lubrication schedule.
- Record maintenance and repair requirements.
13. When Should You Contact a Technical Expert?
Operators can handle many routine checks, but certain problems require professional inspection. Continuing to run a machine with a serious mechanical or electrical fault may increase repair costs and cause further damage.
Contact a qualified technician when you notice:
- Repeated needle and hook timing problems.
- Unusual mechanical noise or excessive vibration.
- Repeated control-board or motor errors.
- Persistent thread trimming failures.
- A head that repeatedly produces defective stitches.
- Frame movement problems that do not improve after basic checks.
- Electrical faults, overheating, or damaged wiring.
Provide the technician with the machine model, error messages, affected head number, and details about when the problem occurs. This information can make diagnosis faster and more accurate.
Choosing the Right Machinery for Your Production Requirements
Improving embroidery production is not only about machine speed. Correct machine settings, regular maintenance, suitable designs, operator knowledge, and timely technical support all contribute to better production efficiency. Understanding the function of individual machine parts also helps operators identify problems early and reduce unnecessary downtime.
When exploring a computerized industrial embroidery machine or other textile machinery, consider the machine's features, production capacity, maintenance requirements, spare parts availability, and after-sales support.
Ramana Machines is a supplier, distributor, and trader of knitting and textile machinery, offering machinery solutions for businesses with different manufacturing requirements. We focus on helping customers explore suitable machinery options based on their production needs, operational requirements, and business goals. Visit www.ramanainternational.com or contact our team to discuss your machinery requirements.